AmamiRyoin's Blog

守得云开见月明


  • 首页

  • 关于

  • 标签

  • 归档
  • High一下

Svelte浅谈

发表于 2021-03-09

探索Svelte

什么是Svelte

Svelte本意是苗条纤瘦的,Svelte是一种构建用户界面的全新方法,它被预测为未来十年可能取代React和Vue等其他框架的新兴技术。作者是前端轮子哥 Rich Harris,同时也是 Rollup 的作者。

他设计 Svelte 的核心思想在于『通过静态编译减少框架运行时的代码量』,也就是说,vue 和 react 这类传统的框架,都必须引入运行时 (runtime) 代码,用于虚拟dom、diff 算法。Svelted完全溶入JavaScript,应用所有需要的运行时代码都包含在bundle.js里面了,除了引入这个组件本身,你不需要再额外引入一个运行代码。
从2019年开始, Svelte出现在榜单中。刚刚过去的2020年,Svelte在满意度排行榜中超越了react,跃升到了第一位。

Svelte的优势

从容量大小来看,Vue58k,React97.5k,而Svelte只有9.7k。性能方面略逊Vue但是强于React。代码量方面碾压Vue和React。同时,Svelte自带数据框架。

Svelte的劣势

  • 没有像AntD那样成熟的UI库。
  • Svelte 原生不支持预处理器,比如说less/scss。
  • Svelte 原生脚手架没有目录划分。
  • 暂时不支持typescript,虽然官方说了会支持, 但是不知道什么时候。

Svelte如何处理渲染问题

众所周知,React采用的虚拟DOM和diff算法来解决渲染问题,但是由于React 采用jsx语法本质不理解数据代表的意义,没有办法做出优化,因此才会出现诸如pureComponent,shouldComponentUpdate,useMemo,useCallback这些生命周期来控制重复渲染问题。

而Svelte 采用了Templates语法(类似于Vue 的写法),更加严格和具有语义性,可以在编译的过程中就进行优化操作。

1
2
3
4
5
6
7
<template>
<div>
<p>{{name}}</p>
<p>8888</p>
<p>8888</p>
</div>
</template>

编译器针对这块template代码可以很清楚地知道哪些代码是会变动,哪些代码不会变动。

Svelte实例代码

  • 小demo

App.svelte

1
2
3
4
5
6
7
<script>
import Button from './button.svelte'
let name = 'world';
</script>

<h1>Hello {name}!</h1>
<Button/>

button.svelte

1
2
3
4
5
6
7
8
9
10
<script>
let count = 0;
function handleClick() {
count += 1;
}
</script>

<button on:click={handleClick}>
Clicked {count} {count === 1 ? 'time' : 'times'}
</button>

  • $:响应式语句
1
2
let count = 0;
$: doubled = count * 2;

在 Svelte 中,以 $: 开头的语句就是响应式语句,Svelte 会自动分析响应式语句所依赖的变量,当依赖变量发生变化时,Svelte 就会重新执行相应的响应式语句。当 Svelte 看到任何带有 $: 前缀的语句时,它就知道要将右边的变量赋值给左边的变量,而不需要使用let将一个变量的值绑定到另一个变量;并且Svelte可以以响应式的方式运行任何语句。

1
2
3
4
5
6
7
8
9
$: console.log(`the count is ${count}`);
$: {
console.log(`the count is ${count}`);
alert(`I SAID THE COUNT IS ${count}`);
}
$: if (count >= 10) {
alert(`count is dangerously high!`);
count = 9;
}

但是Svelte的响应是基于赋值操作的,数组的 push、splice 等操作不会触发响应式更新。

  • 接收Props
1
2
3
4
<script>
export let answer;
// export let answer = 'a mystery'; 初始化value
</script>
  • 生命周期

    1
    2
    3
    4
    5
    6
    7
    8
    9
    10
    11
    12
    <script>
    import { onMount,onDestroy,beforeUpdate,afterUpdate,tick } from 'svelte';

    let photos = [];

    onMount(async () => {
    const res = await fetch(`https://jsonplaceholder.typicode.com/photos?_limit=20`);
    photos = await res.json();
    });

    onDestroy(() => alert('gg'));
    </script>
  • 逻辑判断
    由于HTML没有类似于逻辑判断的语法,因此Svelte加了个这个东西。

    1
    2
    3
    4
    5
    6
    7
    8
    9
    10
    11
    12
    13
    14
    15
    16
    17
    18
    19
    20
    21
    22
    23
    24
    25
    26
    27
    28
    29
    30
    31
    32
    33
    34
    35
    36
    37
    <script>
    let user = { loggedIn: false };

    function toggle() {
    user.loggedIn = !user.loggedIn;
    }
    </script>

    {#if user.loggedIn}
    <button on:click={toggle}>
    Log out
    </button>
    {/if}

    {#if !user.loggedIn}
    <button on:click={toggle}>
    Log in
    </button>
    {/if}
    //或
    {#if user.loggedIn}
    <button on:click={toggle}>
    Log out
    </button>
    {:else}
    <button on:click={toggle}>
    Log in
    </button>
    {/if}
    //或
    {#if x > 10}
    <p>{x} is greater than 10</p>
    {:else if 5 > x}
    <p>{x} is less than 5</p>
    {:else}
    <p>{x} is between 5 and 10</p>
    {/if}
  • 遍历

    1
    2
    3
    4
    5
    {#each cats as cat}
    <li><a target="_blank" href="https://www.youtube.com/watch?v={cat.id}">
    {cat.name}
    </a></li>
    {/each}
  • await

    1
    2
    3
    4
    5
    6
    7
    {#await promise}
    <p>...waiting</p>
    {:then number}
    <p>The number is {number}</p>
    {:catch error}
    <p style="color: red">{error.message}</p>
    {/await}

demo

  • 事件绑定
    1
    2
    3
    4
    5
    6
    <button on:click|once={handleClick}>
    Click me
    </button>
    <button on:click={handleClick}>
    Click me
    </button>

自定义事件

1
2
3
4
5
6
7
8
9
10
11
12
13
14
15
16
17
18
19
20
21
22
23
24
<script>
import Inner from './Inner.svelte';

function handleMessage(event) {
alert(event.detail.text);
}
</script>
<Inner on:message={handleMessage}/>


<script>
import { createEventDispatcher } from 'svelte';

const dispatch = createEventDispatcher();

function sayHello() {
dispatch('message', {
text: 'Hello!'
});
}
</script>
<button on:click={sayHello}>
Click to say hello
</button>
  • Store
    1
    2
    3
    4
    5
    6
    7
    8
    9
    10
    11
    12
    13
    14
    15
    16
    17
    18
    19
    20
    21
    22
    23
    24
    25
    26
    27
    28
    29
    30
    31
    32
    33
    34
    35
    36
    37
    38
    store.js

    import { writable,readable,derived } from 'svelte/store';
    export const count = writable(0);//writable类型的store有update和set两种subscribe方法

    export const time = readable(new Date(), function start(set) {
    const interval = setInterval(() => {
    set(new Date());
    }, 1000);

    return function stop() {
    clearInterval(interval);
    };
    });
    //readable无法从外部进行更新,没有set()或update()方法。一旦设置了初始状态,便无法从外部进行修改。

    export const elapsed = derived(
    time,
    $time => Math.round(($time - 100*Math.random()) / 1000)
    );
    //derived允许您创建依赖于现有存储的值的新存储值

    app.svelte

    <script>
    import { count } from './stores.js';
    import Incrementer from './Incrementer.svelte';
    import Decrementer from './Decrementer.svelte';
    import Resetter from './Resetter.svelte';

    let count_value;

    const unsubscribe = count.subscribe(value => {
    count_value = value;
    });
    </script>

    <h1>The count is {count_value}</h1>

综上。
webpack使用心得总结

发表于 2020-12-02

去除无用的样式

安装: npm i purgecss-webpack-plugin glob -D

1
2
3
4
5
6
7
8
9
10
11
12
13
// 去除无用的样式
const glob = require('glob');
const PurgecssWebpackPlugin = require('purgecss-webpack-plugin');
plugins: [
new HtmlWebpaclPlugin({
template: './src/index.html'
}),
new MiniCssExtractPlugin(),
// 去除无用的样式
new PurgecssWebpackPlugin({
paths: glob.sync('./src/**/*', {nodir: true})
})
]

下面我们来简单分析分析:

glob是用来查找文件的

1
2
3
4
glob.sync('./src/**/*', {nodir: true}
// 同步查找src目录下的任意文件夹下的任意文件
// 返回一个数组,如['真实路径/src/css/style.css','真实路径/src/index.js',...]
// {nodir: true}表示不包含文件夹,加快查找速度

purgecss-webpack-plugin是去除无用的css

1
2
3
4
5
new PurgecssWebpackPlugin({
// paths表示指定要去解析的文件名数组路径
// Purgecss会去解析这些文件然后把无用的样式移除
paths: glob.sync('./src/**/*', {nodir: true})
})

动态添加CDN

在html文件中引入cdn文件,在webpack配置externals,这样就不会打包引入的cdn的库

1
2
3
4
5
6
7
8
9
10
11
12
13
14
15
// index.html文件

<body>
<div id="root"></div>
<!-- 引入jquery的cdn -->
<script src="https://cdn.bootcss.com/jquery/3.4.1/jquery.min.js"></script>
</body>

// webpack.config.js文件

module.exports = {
externals: {
'jquery': '$'
}
}

这样写完后,在js文件中我们就可以不用再导入jquery也能直接使用$操作符了

由于每次都需要在index.html模板中手动引入需要的cdn文件,然后还要在webpack里配置,有点繁琐了

So,html-webpack-externals-plugin这样的插件就应运而生了

1
2
3
4
5
6
7
8
9
10
11
12
13
14
15
16
17
18
19
// 动态添加CDN
const HtmlWebpackExternalsPlugin = require('html-webpack-externals-plugin');

module.exports = {
plugins: [
new HtmlWebpackExternalsPlugin({
externals: [
{ // 引入的模块
module: 'jquery',
// cdn的地址
entry: 'https://cdn.bootcss.com/jquery/3.4.1/jquery.min.js',
// 挂载到了window上的名称
// window.jQuery就可以全局使用
global: 'jQuery'
}
]
})
]
};

DllPlugin动态链接库

很多时候我们在开发时无论是用React还是Vue,我们都不希望这个开发的主力框架每次都被打包一遍,这样也是费时费力的事情

所以,出现了DllPlugin这种插件,它纯属webpack内置的,放心大胆的用

作用:

  1. 在第一次打包的时候就把打包用到的开发框架直接打包好,然后会生成一个manifest.json文件
  2. 再打包的的时候,只要有import React from ‘react’这样的引用,它就会先去所谓的缓存文件里找,找到了就直接用,也不用再进行对react打包了
  3. 如果没找到的话,再对框架打包一遍也无伤大雅

创建动态链接库
在根目录下创建一个webpack.dll.js文件,用来打包出dll文件

1
2
3
4
5
6
7
8
9
10
11
12
13
14
15
16
17
18
19
const path = require('path');
// 引入webpack
const webpack = require('webpack');

module.exports = {
entry: ['react', 'react-dom'],
output: {
filename: 'react.dll.js',
path: path.resolve('dll'),
library: 'react' // 打包后被引用的变量名
},
plugins: [
// 动态链接库
new webpack.DllPlugin({
name: 'react',
path: path.resolve('dll', 'manifest.json')
})
]
};

代码写完了,npm run dll,之后会出现一个dll的文件夹,里面会包含你打包出来的文件

引用动态链接库

1
2
3
4
5
6
7
8
9
10
11
12
13
const path = require('path');
// 引入webpack
const webpack = require('webpack');

module.exports = {
plugins: [
// 引用对应的动态链接库的manifest.json文件
// 这样以后再引入react的时候就会优先在json文件里去寻找
new webpack.DllReferencePlugin({
manifest: path.resolve('dll', 'manifest.json')
})
]
};

写到这里还不算完,还需要在src目录下的index.html模板中引入一下

1
<script src="../dll/react.dll.js"></script>

之所以,会新建一个dll目录,因为在npm start开发环境编译的时候,dist目录的内容都在内存中了,是找不到react.dll.js文件的

动态引入js
通过add-asset-html-webpack-plugin插件就可以完成这样的需求

1
2
3
4
5
6
7
8
9
10
11
12
13
14
15
16
17
18
// webpack.config.js文件

const webpack = require('webpack');
// 添加资源到html文件
const AddAssetHtmlWebpackPlugin = require('add-asset-html-webpack-plugin');

module.exports = {
plugins: [
// 引用打包好的react,不会打包到bundle里
new webpack.DllReferencePlugin({
manifest: path.resolve('dll', 'manifest.json')
}),
// 直接将打包好的react.dll.js添加到html模板
new AddAssetHtmlWebpackPlugin({
filepath: path.resolve('dll', 'react.dll.js')
})
]
};

懒加载

说到懒加载必然是一种很好的优化网页或应用的方式,那么在webpack中也是通过ES6的import()语法来引入的。

1
2
3
4
5
6
7
8
9
10
11
12
13
14
15
16
17
18
19
20
21
22
23
24
25
26
import React, { Component, Fragment } from "react";
import moment from "moment";
import "moment/locale/zh-cn";

// 设置中文
// moment.locale("zh-cn");

export default class List extends Component {
btnClick = () => {
import("./test").then((data) => {
console.log(data);
data.a();
});
};
render() {
console.log($);
let time = moment().format("YYYY-MM-DD HH:mm:ss");
return (
<Fragment>
<div>{time}</div>
<div>111</div>
<button onClick={this.btnClick}>222</button>
</Fragment>
);
}
}

抽取公共代码

比如有两个js文件,一个是index.js另一个是lrc.js,它们都引用了著名的实用工具库lodash,代码如下

1
2
3
4
5
6
7
8
9
// index.js文件

import _ from 'lodash';
console.log(_.xor([2, 1], [2, 3]));


// lrc.js文件
import _ from 'lodash';
console.log(_.flatten([1,[3, 4, 5, [2]]]));

抽取第三方模块

1
2
3
4
5
6
7
8
9
10
11
12
13
14
15
16
17
// webpack.config.js文件

module.exports = {
optimization: {
splitChunks: {
cacheGroups: {
vendor: {
chunks: 'initial',
minSize: 0,
minChunks: 2,
test: /node_modules/,
priority: 1
}
}
}
}
};

抽取公共模块

1
2
3
4
5
6
7
// index.js文件
import { flatten } from './common';
console.log('index',flatten([1,[33, 4, 5, [34]]]));

// lrc.js文件
import {flatten} from './common';
console.log(flatten([1,[33, 4, 5, [34]]]));

1
2
3
4
5
6
7
8
9
10
11
12
13
14
15
// webpack.config.js文件

module.exports = {
optimization: {
splitChunks: {
cacheGroups: {
utils: {
chunks: 'initial',
minSize: 0,
minChunks: 2
}
}
}
}
};

IgnorePlugin

作用: 忽略打包第三方模块指定的目录

为什么要忽略呢? 通过下面的栗子来看一下

相信很多人应该或多或少的都听过moment这个时间库,不知道也没关系,我来演示一波

先安装moment: npm i moment -S

1
2
3
4
5
6
7
8
9
10
// index.js文件

// 导入moment
import moment from 'moment';

// 设置中文
moment.locale('zh-cn');
let time = moment().endOf('day').fromNow();

window.root.innerHTML += time;

页面上展示的一点毛病都没有,不过如果看一下打包的情况就会发现有瑕疵了

设置了中文,却把整个语言包都打包进去了,这样很不好

这是神马原因呢,其实是因为moment被导入的时候,附赠了整个locale语言包,这种买一赠一的行为就不用提现在代码世界了,吃不消了

我们需要用中文包,但是不想打包全部语言包,就让IgnorePlugin出马了

1
2
3
4
5
6
7
8
9
10
// webpack.config.js文件

const webpack = require('webpack');

module.exports = {
plugins: [
// 忽略moment目录下的locale文件夹
new webpack.IgnorePlugin(/\.\/locale/, /moment/)
]
};

配置改写后,再回到index.js中单独导入中文语言包就好了

1
2
3
4
5
6
7
8
9
10
// index.js文件

// 利用IgnorePlugin把只需要的语言包导入使用就可以了,省去了一下子打包整个语言包
import moment from 'moment';
// 单独导入中文语言包
import 'moment/locale/zh-cn';

let time = moment().endOf('day').fromNow();

window.root.innerHTML += time;

noParse

noParse的作用是不去解析你所使用的第三方库中的依赖库

1
2
3
4
5
6
7
8
9
10
11
12
13
14
module.exports = {
module: {
// 不去解析jquery或lodash中的依赖库
noParse: /jquery|lodash/,
rules: [
{
test: /\.js$/,
use: {
loader: 'babel-loader'
}
}
]
}
}

在工作中,忽略大型的库可以提高构建性能,可以从构建时间上看出来速度的提升,如上面代码中提到的jquery和lodash

resolve

从这个英文就能看出来,它就是配置模块如何解析用的,配置太多也没必要一一介绍了,还是直接说重点写出常用的配置吧

resolve常用配置

  1. modules
    1. 指定解析第三方包的目录位置
  2. alias
    1. 指定import导入时的别名,简化引入
  3. extensions
    1. 自动解析确定好的扩展名
    2. 默认会把js和json当做扩展名
1
2
3
4
5
6
7
8
9
10
11
12
const { resolve } = require('path');

module.exports = {
resolve: {
modules: [resolve('node_modules')],
alias: {
Utils: resolve(__dirname, 'src/utils/'),
'@': resolve(__dirname, 'src')
},
extensions: ['.js', '.css', '.json']
}
}

include和exclude

  1. include: 包含指定目录下的文件解析
  2. exclude: 排除指定目录不进行解析

二者使用一个即可了

1
2
3
4
5
6
7
8
9
10
11
12
13
14
module.exports = {
module: {
rules: [
{
test: /\.js$/,
use: {
loader: 'babel-loader'
},
exculde: /node_modules/, // 二选一
include: path.resolve('src') // 二选一
}
]
}
}

happypack

webpack在Node环境下运行所以也是单线程操作,一件一件的去处理事情。
于是乎,就有了happypack的用武之地了,它的作用就是可以实现多进程打包操作

1
2
3
4
5
6
7
8
9
10
11
12
13
14
15
16
17
18
19
20
21
22
23
24
25
26
27
28
29
30
31
32
33
34
35
36
37
38
// webpack.config.js文件

const Happypack = require('happypack');

module.exports = {
module: {
rules: [
{
test: /\.js$/,
use: 'Happypack/loader?id=js'
},
{
test: /\.css$/,
use: 'Happypack/loader?id=css'
}
]
},
plugins: [
new Happypack({
id: 'js',
loaders: [
{
loader: 'babel-loader',
options: {
presets: [
'@babel/preset-env',
'@babel/preset-react'
]
}
}
]
}),
new Happypack({
id: 'css',
loaders: ['style-loader', 'css-loader']
})
]
}

由于HappyPack 对file-loader、url-loader 支持的不友好,所以不建议对该loader使用。

HappyPack 参数

  1. id: String 用唯一的标识符 id 来代表当前的 HappyPack 是用来处理一类特定的文件.
  2. loaders: Array 用法和 webpack Loader 配置中一样.
  3. threads: Number 代表开启几个子进程去处理这一类型的文件,默认是3个,类型必须是整数。
  4. verbose: Boolean 是否允许 HappyPack 输出日志,默认是 true。
  5. threadPool: HappyThreadPool 代表共享进程池,即多个 HappyPack 实例都使用同一个共享进程池中的子进程去处理任务,以防止资源占用过多。
  6. verboseWhenProfiling: Boolean 开启webpack –profile ,仍然希望HappyPack产生输出。
  7. debug: Boolean 启用debug 用于故障排查。默认 false。

JS中的设计模式

发表于 2020-07-12

在程序设计中有很多实用的设计模式,而其中大部分语言的实现都是基于“类”。

在JavaScript中并没有类这种概念,JS中的函数属于一等对象,在JS中定义一个对象非常简单(var obj = {}),而基于JS中闭包与弱类型等特性,在实现一些设计模式的方式上与众不同。

本文参照了《JavaScript 设计模式》一书,做了一些总结和个人理解。

设计原则

单一职责原则(SRP)

一个对象或方法只做一件事情。如果一个方法承担了过多的职责,那么在需求的变迁过程中,需要改写这个方法的可能性就越大。应该把对象或方法划分成较小的粒度。

最少知识原则(LKP)

一个软件实体应当 尽可能少地与其他实体发生相互作用。
应当尽量减少对象之间的交互。如果两个对象之间不必彼此直接通信,那么这两个对象就不要发生直接的 相互联系,可以转交给第三方进行处理。

开放-封闭原则(OCP)

软件实体(类、模块、函数)等应该是可以扩展的,但是不可修改。
当需要改变一个程序的功能或者给这个程序增加新功能的时候,可以使用增加代码的方式,尽量避免改动程序的源代码,防止影响原系统的稳定。

什么是设计模式

这里有个很好的比喻。

1
假设有一个空房间,我们要日复一日地往里 面放一些东西。最简单的办法当然是把这些东西 直接扔进去,但是时间久了,就会发现很难从这 个房子里找到自己想要的东西,要调整某几样东 西的位置也不容易。所以在房间里做一些柜子也 许是个更好的选择,虽然柜子会增加我们的成 本,但它可以在维护阶段为我们带来好处。使用 这些柜子存放东西的规则,或许就是一种模式。

设计模式的原则是“找出 程序中变化的地方,并将变化封装起来”,它的关键是意图,而不是结构。

几种设计模式

构造器模式

  • 定义
    在面向对象编程中,构造器是一个当新建对象的内存被分配后,用来初始化该对象的一个特殊函数。
    对象构造器是被用来创建特殊类型的对象的,首先它要准备使用的对象,其次在对象初次被创建时,通过接收参数,构造器要用来对成员的属性和方法进行赋值。
    Javascript不支持类的概念,但它有一种与对象一起工作的构造器函数。使用new关键字来调用该函数,我们可以告诉Javascript把这个函数当做一个构造器来用,它可以用自己所定义的成员来初始化一个对象。构造器内部,关键字this引用到刚被创建的对象。
1
2
3
4
5
6
7
8
9
10
11
12
13
function mataChuan( name, age, identity ) {

this.name = name;
this.age = age;
this.identity = identity;
}

mataChuan.prototype.bearingRight = function () {
return '你是不是个龙鸣';
};

// 我们可以示例化一个mataChuan
var mataChuan = new mataChuan( "mataChuan", 30, '日本新津天皇' );

单例模式

  • 定义
    保证一个类仅有一个实例,并提供一个访问它的全局访问点。
1
2
3
4
5
6
7
8
9
10
11
12
13
14
15
16
17
18
19
20
21
22
23
24
25
26
function SetMataChuan(name) {
this.name = name;
}

SetMataChuan.prototype.getName = function() {
console.log(this.name);
};

// 提取出通用的单例
function getSingle(fn) {
var instance = null;
return function() {
if (!instance) {
instance = fn.apply(this, arguments);
}

return instance;
}
}

let SingleSetMataChuan = getSingle(function(name){
let mataChuan = new SetMataChuan(name);
return mataChuan.getName()
});

SingleSetMataChuan('mataChuan'); // mataChuan

工厂模式

  • 定义
    工厂模式是一种关注对象创建概念的创建模式。它的领域中同其它模式的不同之处在于它并没有明确要求我们使用一个构造器。取而代之,一个工厂能提供一个创建对象的公共接口,我们可以在其中指定我们希望被创建的工厂对象的类型。
1
2
3
4
5
6
7
8
9
10
11
12
13
14
15
16
17
18
19
20
21
22
23
24
25
26
27
28
29
30
31
32
33
34
35
36
37
38
39
40
var mataChuan  = function(){
this.nickName = '带带大师兄';
}

mataChuan.prototype = {
getGuoji :function(){
console.log('我是日本人,来中国留学好久了');
},
getSkill:function(){
console.log('-8000')
}
}

var Dingxiaoxiao = function(){
this.name = '丁潇潇';
}

Dingxiaoxiao.prototype = {
callMataChuan :function(){
console.log('mataChuan我们双流机场见一面');
},
getSkill:function(){
console.log('+8000')
}
}

var factory = function(type){
switch(type){
case 'Dingxiaoxiao': return new Dingxiaoxiao();
case 'mataChuan': return new mataChuan();
}
}

//然后我们就可以这么用
var mataChuan = factory('mataChuan');
var Dingxiaoxiao = factory('Dingxiaoxiao');
mataChuan.getGuoji();
Dingxiaoxiao.callMataChuan();
mataChuan.getSkill();
Dingxiaoxiao.getSkill();

策略模式

  • 定义
    定义一系列的算法,把它们一个个封装起来,并且使它们可以相互替换,从而避免很多if语句
1
2
3
4
5
6
7
8
9
10
11
12
13
14
15
let mataChuanSkills = {
"恰烂钱": function(money) {
return money * 2;
},
"网恋" : function(money) {
return money-8000;
},
"和深海哥打招呼" : function(money) {
return money * 20;
}
};
let mataChuanAction =function(type,money) {
return obj[type](money);
};
console.log(mataChuanAction('网恋',8000)); // 0

代理模式

  • 定义
    为一个对象提供一个代用品或占位符,以便控制对它的访问。代理模式主要有三种:保护代理、虚拟代理、缓存代理。

保护代理主要实现了访问主体的限制行为,以过滤字符作为简单的例子。

1
2
3
4
5
6
7
8
9
10
11
12
13
14
15
16
17
18
19
20
21
22
23
24
25

// 主体,发送消息
function sendMsg(msg) {
console.log(msg);
}

// 代理,对消息进行过滤
function proxySendMsg(msg) {
// 无消息则直接返回
if (typeof msg === 'undefined') {
console.log('好久不见深海哥');
return;
}

// 有消息则进行过滤
msg = msg.replace(/龙鸣给爷爬/g, '你好');

sendMsg(msg);
}


sendMsg('龙鸣给爷爬,XXX'); // 龙鸣给爷爬,XXX
proxySendMsg('龙鸣给爷爬,XXX'); // 你好,XXX
proxySendMsg(); // 好久不见深海哥
//在访问主体之前进行控制,没有消息的时候直接在代理中返回了,拒绝访问主体

缓存代理可以为一些开销大的运算结果提供暂时的缓存,提升效率。

1
2
3
4
5
6
7
8
9
10
11
12
13
14
15
16
17
18
19
20
21
22
23
24
25
26
// 主体
function addGeng() {
var gengs = [].slice.call(arguments).join(',');
return gengs;
}

// 代理
var proxyAddGeng = (function() {
var oldGengs = '';
return function() {
var gengs = [].slice.call(arguments).join(',');
// 如果有,则直接从缓存返回
if (oldGengs.indexOf(gengs)>-1) {
console.log('已有梗',gengs)
return oldGengs;
} else {
oldGengs+=addGeng.apply(this, arguments);
return oldGengs;
}
};
})();

console.log(
proxyAddGeng('爬','龙鸣'),
proxyAddGeng('爬','龙鸣')
);

虚拟代理在控制对主体的访问时,加入了一些额外的操作。

1
2
3
4
5
6
7
8
9
10
11
12
13
14
15
16
17
18
var mataChuan = function(name){
this.name = name;
}
//隐藏复杂,不愿意修改的的方法
var dogFans = function(mataChuan){
this.mataChuan = mataChuan;
this.send = function(fakeMsg){
console.log(fakeMsg+'@'+this.mataChuan.name);
}
}
var weibo = function(targetMan){
this.send = function(fakeMsg){
new dogFans(targetMan).send(fakeMsg);
}
}
var weibo = new weibo(new mataChuan("mata川"));
weibo.send("用激光笔照射坤坤的凶手找到了");
weibo.send("火烧明尼苏达烂尾楼的凶手找到了");

装饰者模式

  • 定义
    以动态地给某个对象添加一些额外的职责,而不会影响从这个类中派生的其他对象。
    是一种“即用即付”的方式,能够在不改变对 象自身的基础上,在程序运行期间给对象动态地 添加职责。
    1
    2
    3
    4
    5
    6
    7
    8
    9
    10
    11
    12
    13
    14
    15
    16
    17
    18
    19
    20
    21
    22
    23
    24
    25
    26
    27
    28
    29
    30
    31
    32
    33
    34
    // 装饰器,在当前函数执行前先执行另一个函数
    function decoratorBefore(fn, beforeFn) {
    return function() {
    var ret = beforeFn.apply(this, arguments);

    // 在前一个函数中判断,不需要执行当前函数
    if (ret !== false) {
    fn.apply(this, arguments);
    }
    };
    }


    function netKoi() {
    console.log('网恋');
    }

    function buyTicket() {
    console.log('买机票');
    }

    function driveCar() {
    console.log('开车');
    }

    function screwed(){
    console.log('被骗-8000');
    }

    var skillDecorator = decoratorBefore(screwed, buyTicket);
    skillDecorator = decoratorBefore(skillDecorator, driveCar);
    skillDecorator = decoratorBefore(skillDecorator, netKoi);

    skillDecorator(); // 跑步 音乐 数学

命令模式

  • 定义
    用一种松耦合的方式来设计程序,使得请求发送者和请求接收者能够消除彼此之间的耦合关系。
    命名模式的目标是将方法的调用,请求或者操作封装到一个单独的对象中,给我们酌情执行同时参数化和传递方法调用的能力.另外,它使得我们能将对象从实现了行为的对象对这些行为的调用进行解耦,为我们带来了换出具体的对象这一更深程度的整体灵活性。
    实现明智简单的命令对象,将一个行为和对象对调用这个行为的需求都绑定到了一起.它们始终都包含一个执行操作(比如run()或者execute()).所有带有相同接口的命令对象能够被简单地根据需要调换,这被认为是命令模式的更大的好处之一。
1
2
3
4
5
6
7
8
9
10
11
12
13
14
15
16
17
18
19
20
21
22
23
var CarManager = {

// request information
requestInfo: function( model, id ){
return "The information for " + model + " with ID " + id + " is foobar";
},

// purchase the car
buyVehicle: function( model, id ){
return "You have successfully purchased Item " + id + ", a " + model;
},

// arrange a viewing
arrangeViewing: function( model, id ){
return "You have successfully booked a viewing of " + model + " ( " + id + " ) ";
}

};
CarManager.execute = function ( name ) {
return CarManager[name] && CarManager[name].apply( CarManager, [].slice.call(arguments, 1) );
};

CarManager.execute( "arrangeViewing", "Ferrari", "14523" );

puppeteer浅谈

发表于 2020-05-22

puppeteer浅谈

Puppeteer 是什么

  • Puppeteer 是 Node.js 工具引擎
  • Puppeteer 提供了一系列 API,通过 Chrome DevTools Protocol 协议控制 Chromium/Chrome 浏览器的行为
  • Puppeteer 默认情况下是以 headless 启动 Chrome 的,也可以通过参数控制启动有界面的 Chrome
  • Puppeteer 默认绑定最新的 Chromium 版本,也可以自己设置不同版本的绑定
  • Puppeteer 让我们不需要了解太多的底层 CDP 协议实现与浏览器的通信

Puppeteer 能做什么

  • 网页截图或者生成 PDF
  • 爬取 SPA 或 SSR 网站
  • UI 自动化测试,模拟表单提交,键盘输入,点击等行为
  • 捕获网站的时间线,帮助诊断性能问题
  • 创建一个最新的自动化测试环境,使用最新的 js 和最新的 Chrome 浏览器运行测试用例
  • 测试 Chrome 扩展程序

Puppeteer常用类

  • Browser: 对应一个浏览器实例,一个 Browser 可以包含多个 BrowserContext
  • BrowserContext: 对应浏览器一个上下文会话,就像我们打开一个普通的 Chrome 之后又打开一个隐身模式的浏览器一样,BrowserContext 具有独立的 Session(cookie 和 cache 独立不共享),一个 BrowserContext 可以包含多个 Page
  • Page:表示一个 Tab 页面,通过 browserContext.newPage()/browser.newPage() 创建,browser.newPage() 创建页面时会使用默认的 BrowserContext,一个 Page 可以包含多个 Frame
  • Frame: 一个框架,每个页面有一个主框架(page.MainFrame()),也可以多个子框架,主要由 iframe 标签创建产生的
  • ExecutionContext: 是 javascript 的执行环境,每一个 Frame 都一个默认的 javascript 执行环境
  • ElementHandle: 对应 DOM 的一个元素节点,通过该该实例可以实现对元素的点击,填写表单等行为,我们可以通过选择器,xPath 等来获取对应的元素
  • JsHandle:对应 DOM 中的 javascript 对象,ElementHandle 继承于 JsHandle,由于我们无法直接操作 DOM 中对象,所以封装成 JsHandle 来实现相关功能
  • CDPSession:可以直接与原生的 CDP 进行通信,通过 session.send 函数直接发消息,通过 session.on 接收消息,可以实现 Puppeteer API 中没有涉及的功能
  • Coverage:获取 JavaScript 和 CSS 代码覆盖率
  • Tracing:抓取性能数据进行分析
  • Response: 页面收到的响应
  • Request: 页面发出的请求

创建一个 Browser 实例

puppeteer.launch: 每次都启动一个 Chrome 实例

1
2
3
4
5
6
7
8
9
10
11
12
13
14
15
16
17
18
const puppeteer = require('puppeteer');
let request = require('request-promise-native');

//使用 puppeteer.launch 启动 Chrome
(async () => {
const browser = await puppeteer.launch({
headless: false, //有浏览器界面启动
slowMo: 100, //放慢浏览器执行速度,方便测试观察
args: [ //启动 Chrome 的参数,详见上文中的介绍
'–no-sandbox',
'--window-size=1280,960'
],
});
const page = await browser.newPage();
await page.goto('https://www.baidu.com');
await page.close();
await browser.close();
})();

等待元素、请求、响应

  • page.waitForXPath:等待 xPath 对应的元素出现,返回对应的 ElementHandle 实例
  • page.waitForSelector :等待选择器对应的元素出现,返回对应的 ElementHandle 实例
  • page.waitForResponse :等待某个响应结束,返回 Response 实例
  • page.waitForRequest:等待某个请求出现,返回 Request 实例
  • page.waitForFunction:等待在页面中自定义函数的执行结果,返回 JsHandle 实例
  • page.waitFor:设置等待时间,实在没办法的做法

具体用例

截图

1
2
3
4
5
6
7
8
9
10
11
12
13
14
15
16
17
18
19
20
21
(async () => {
const browser = await puppeteer.launch();
const page = await browser.newPage();
//设置可视区域大小
await page.setViewport({width: 1920, height: 800});
await page.goto('https://www.baidu.com/');
//对整个页面截图
await page.screenshot({
path: './capture.png', //图片保存路径
type: 'png',
fullPage: true //边滚动边截图
// clip: {x: 0, y: 0, width: 1920, height: 800}
});
//对页面某个元素截图
let [element] = await page.$x('/html/body/div/div[1]/div[5]');
await element.screenshot({
path: './element.png'
});
await page.close();
await browser.close();
})();

模拟用户登录

1
2
3
4
5
6
7
8
9
10
11
12
13
14
15
16
17
18
19
20
21
22
23
24
25
26
(async () => {
const browser = await puppeteer.launch({
slowMo: 100, //放慢速度
headless: false,
defaultViewport: {width: 1440, height: 780},
ignoreHTTPSErrors: false, //忽略 https 报错
args: ['--start-fullscreen'] //全屏打开页面
});
const page = await browser.newPage();
await page.goto('https://passport.bilibili.com/login');
//输入账号密码
const uniqueIdElement = await page.$('#uniqueId');
await uniqueIdElement.type('admin@admin.com', {delay: 20});
const passwordElement = await page.$('#password', {delay: 20});
await passwordElement.type('123456');
//点击确定按钮进行登录
let okButtonElement = await page.$('#btn-ok');
//等待页面跳转完成,一般点击某个按钮需要跳转时,都需要等待 page.waitForNavigation() 执行完毕才表示跳转成功
await Promise.all([
okButtonElement.click(),
page.waitForNavigation()
]);
console.log('admin 登录成功');
await page.close();
await browser.close();
})();

请求拦截

1
2
3
4
5
6
7
8
9
10
11
12
13
14
15
16
17
18
19
20
21
22
23
(async () => {
const browser = await puppeteer.launch();
const page = await browser.newPage();
await page.setRequestInterception(true); //开启请求拦截
page.on('request', request => {
const method = request._method;
if(method){
//直接阻止请求
return request.abort();
}else{
//对请求重写
return request.continue({
//可以对 url,method,postData,headers 进行覆盖
headers: Object.assign({}, request.headers(), {
'puppeteer-test': 'true'
})
});
}
});
await page.goto('https://www.bilibili.com/');
await page.close();
await browser.close();
})();

植入 javascript 代码

1
2
3
4
5
6
7
8
9
10
11
12
13
14
15
(async () => {
const browser = await puppeteer.launch();
const page = await browser.newPage();
await page.goto('https://www.bilibili.com/');
//注册一个 Node.js 函数,在浏览器里运行
//通过 page.evaluate 在浏览器里执行代码
await page.evaluate(async () => {
setTimeout(()=>{
document.querySelector('.logout-face').src='https://ss0.bdstatic.com/70cFvHSh_Q1YnxGkpoWK1HF6hhy/it/u=185623326,2667787122&fm=26&gp=0.jpg';
document.querySelector('#van-popover-9482').innerHTML='全是我干的';
},3000)
});
await page.close();
await browser.close();
})();

模拟不同的设备

1
2
3
4
5
6
7
8
9
const puppeteer = require('puppeteer');
const iPhone = puppeteer.devices['iPhone X'];
puppeteer.launch({
headless:false
}).then(async browser => {
const page = await browser.newPage();
await page.emulate(iPhone);
await page.goto('https://www.bilibili.com/');
});

换肤

发表于 2020-02-24

使用前的准备

  • 安装 antd-theme-generator (color.js脚本中使用该库进行打包)

  • 安装 postcss-css-variables (考虑var()兼容性)

  • html模板中引入less.js库,并设置less配置项,引入新增的less文件

1
2
3
4
5
6
7
8
9
10
<!--在线编译的less文件 -->
<link rel="stylesheet/less" type="text/css" href="/assets/color.less" />
<script>
<!--less配置项-->
window.less = {
async: false, // 同步加载的方式引入
env: 'production' // 生产环境不打log 不报错,数据存入localstorage中
};
</script>
<script src="https://cdn.bootcss.com/less.js/2.7.2/less.min.js"></script>

使用中的步骤

  • 项目目录下新建color.js文件,修改package.json中脚本命令,在执行前先node color && yarn start
1
2
3
4
5
6
7
8
9
10
11
12
13
14
15
16
17
18
19
20
21
22
23
const path = require('path');
const {generateTheme} = require('antd-theme-generator');

const options = {
stylesDir: path.join(__dirname, './src/assets/less'),
antDir: path.join(__dirname, './node_modules/antd'),
varFile: path.join(__dirname, './src/assets/less/vars.less'),
mainLessFile: path.join(__dirname, './src/assets/less/main.less'),
themeVariables: [
'@primary-color',
'@btnActiveColor'
],
outputFilePath: path.join(__dirname, './public/assets/color.less'),
customColorRegexArray: [/^darken\(.*\)$/]
};

generateTheme(options)
.then(less => {
console.log('Theme generated successfully');
})
.catch(error => {
console.log('Error', error);
});
  • 新增一个css变量需要以下四步(如果不需要考虑兼容性,步骤2和3可以省略)
  1. 在color.js的themeVariables数组中添加less变量名@btnColor(未在此处申明的变量后面是无法通过modifyVars修改变量值的)

  2. 在vars.less中添加less变量的初始值@btnColor:#fffffe后,在:root{}中设置同名css变量并赋值--btnColor: @btnColor

    1
    2
    3
    4
    5
    6
    7
    8
    9
    10
    11
    12
    13
    // 引入antd主题文件
    @import '~antd/lib/style/themes/default.less';

    // 改写antd默认变量值
    @primary-color: #ffc847;
    // 添加自定义变量
    @btnActiveColor: #fffffe;

    // 搭配css变量,控制非antd组件的样式
    :root {
    --primary: @primary-color;
    --btnActiveColor: @btnActiveColor;
    }
  3. 在cssVariabelConfig.js文件中,配置css变量的默认值(用于webpack打包时,生成兼容不支持css变量的环境)

    1
    2
    3
    4
    5
    6
    7
    8
    9
    10
    11
    12
    13
    14
    15
    16
    17
    18
    19
    20
    21
    22
    23
    24
    25
    26
    27
    28
    29
    30
    31
    32
    33
    34
    35
    36
    37
    38
    39
    40
    // cssVariabelConfig.js
    module.exports = {
    '--primary-color': "#ffc847",
    '--btnActiveColor': '#fffffe',
    }

    // webpack
    const cssvariables = require('postcss-css-variables');
    const cssVariablesConfig = require('./theme/cssVariabelConfig')

    {
    test: /\.less$/,
    use: [
    require.resolve('style-loader'),
    require.resolve('css-loader'), {
    loader: require.resolve('postcss-loader'),
    options: {
    ident: 'postcss',
    plugins: () => [
    require('postcss-flexbugs-fixes'),
    autoprefixer({
    browsers: [
    'last 2 versions',
    ]
    }),
    cssvariables({
    preserve: true,
    preserveInjectedVariables: false,
    variables:cssVariablesConfig
    })
    ],
    },
    }, {
    loader: require.resolve('less-loader'),
    options: {
    // modifyVars: antdTheme, // 如果配了这属性 要去掉
    },
    },
    ],
    }
  4. 在theme.js中,配置各个主题下变量@btnColor的实际值

    1
    2
    3
    4
    5
    6
    7
    8
    9
    10
    11
    12
    13
    14
    {
    default: {
    '@primary-color': '#ffc847',
    '@text-color': '#ffffff'
    },
    blue: {
    '@primary-color': '#4560e6',
    '@text-color': '#333'
    },
    yellow: {
    '@primary-color': '#ff6600',
    '@text-color': '#333'
    }
    }
  • 调用less.js的modifyVars(option)方法修改主题option:{‘@primary-color’: ‘#fff’}
    1
    2
    3
    4
    5
    6
    7
    8
    window.less
    .modifyVars(option)
    .then(()=>{
    <!--成功-->
    })
    .catch(e=>{
    <!--失败-->
    })

使用后的问题

  • 只适用于less文件

  • color.js生成的文件内容会存到localstorage中(内容较多)

  • 内联和行内样式,涉及到主题的(color, background-color, border-color等色值属性)应全部改写到less文件中

  • antd的主题样式在打包时就已经全部引入,但不会影响antd已有的按需加载

  • antd变量与css变量在命名时需要区分(驼峰和横线)避免在自定义的样式中修改了antd的变量

  • 针对一些其他库(类似echarts)的色值匹配,抽出了公共方法,可根据当前主题类型,使用该类型中的配置属性

    1
    2
    3
    4
    5
    6
    7
    8
    9
    10
    11
    // 获取当前账户主题
    export const getActiveUserTheme = () => {
    let userInfo = JSON.parse(sessionStorage.getItem('userInfo') || '{}');
    let themeCustom = JSON.parse(localStorage.getItem('themeCustom') || '{}');
    let type = themeCustom[userInfo.id] || 'default';
    let activeTheme = themeConfig[type];
    return {
    type, // 主题类型
    activeTheme // 该主题类型下的配置对象
    };
    };

也许能用到的webApi

发表于 2019-10-16

一些也许能用到的webApi

简介

众所周知Web发展到2.0了,html也到5了,其中增加了很多webApi,今天就来挑几个webApi来讲讲。

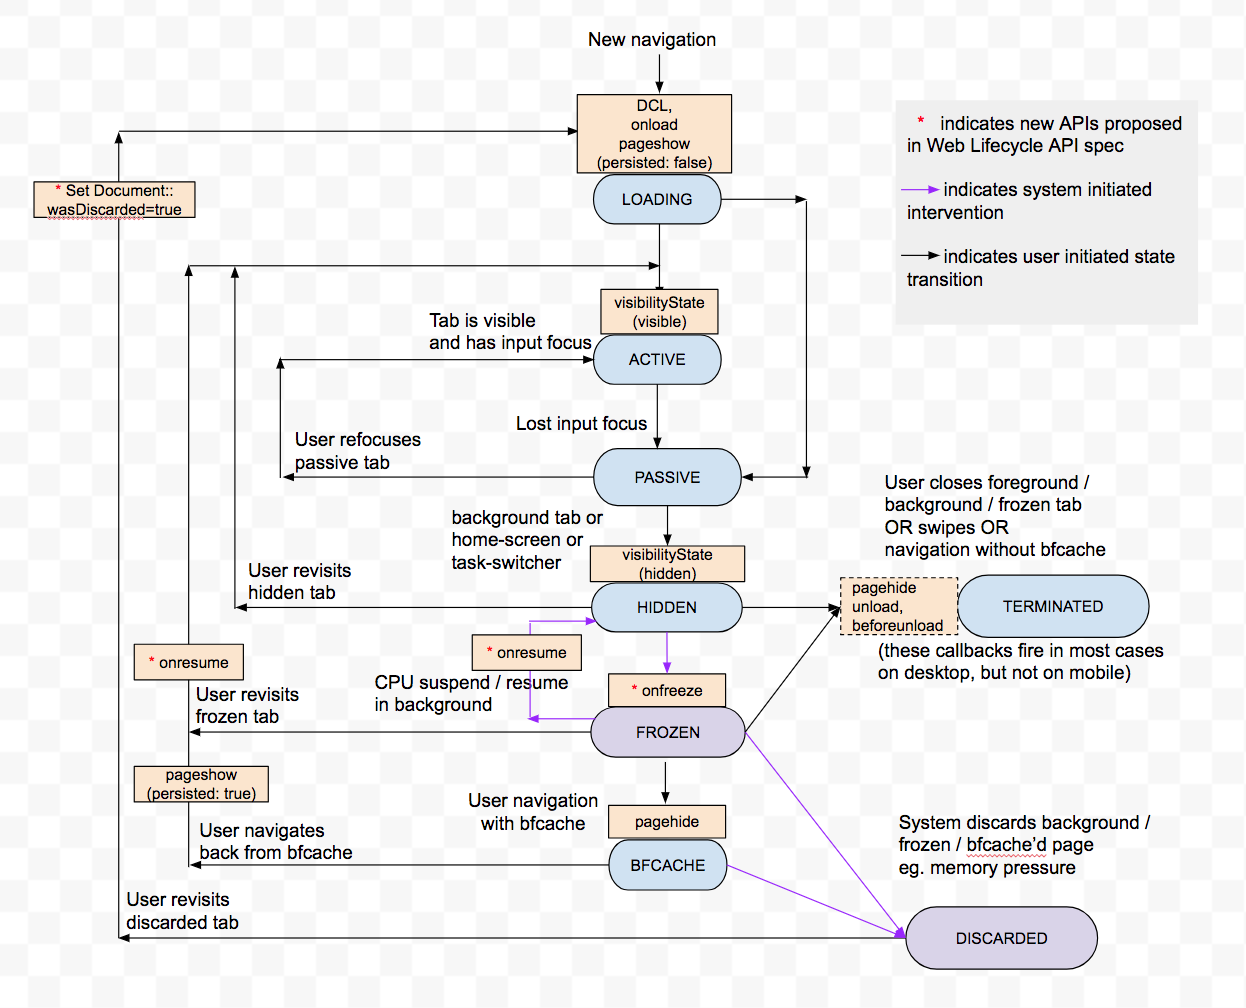
page lifecycle(网页生命周期)

这个生命周期可以让我们把控整个网页从诞生到卸载的全部情况,它主要分为以下几个生命周期:

  • Active 阶段

    在 Active 阶段,网页处于可见状态,且拥有输入焦点。

  • Passive 阶段

    在 Passive 阶段,网页可见,但没有输入焦点,无法接受输入。UI 更新(比如动画)仍然在执行。该阶段只可能发生在桌面同时有多个窗口的情况。

  • Hidden 阶段

    在 Hidden 阶段,用户的桌面被其他窗口占据,网页不可见,但尚未冻结。UI 更新不再执行。

  • Terminated 阶段

    在 Terminated 阶段,由于用户主动关闭窗口,或者在同一个窗口前往其他页面,导致当前页面开始被浏览器卸载并从内存中清除。注意,这个阶段总是在 Hidden 阶段之后发生,也就是说,用户主动离开当前页面,总是先进入 Hidden 阶段,再进入 Terminated 阶段。

    这个阶段会导致网页卸载,任何新任务都不会在这个阶段启动,并且如果运行时间太长,正在进行的任务可能会被终止。

  • Frozen 阶段

    如果网页处于 Hidden 阶段的时间过久,用户又不关闭网页,浏览器就有可能冻结网页,使其进入 Frozen 阶段。不过,也有可能,处于可见状态的页面长时间没有操作,也会进入 Frozen 阶段。

    这个阶段的特征是,网页不会再被分配 CPU 计算资源。定时器、回调函数、网络 请求、DOM 操作都不会执行,不过正在运行的任务会执行完。浏览器可能会允许 Frozen 阶段的页面,周期性复苏一小段时间,短暂变回 Hidden 状态,允许一小部分任务执行。

  • Discarded 阶段

    如果网页长时间处于 Frozen 阶段,用户又不唤醒页面,那么就会进入 Discarded 阶段,即浏览器自动卸载网页,清除该网页的内存占用。不过,Passive 阶段的网页如果长时间没有互动,也可能直接进入 Discarded 阶段。

    这一般是在用户没有介入的情况下,由系统强制执行。任何类型的新任务或 JavaScript 代码,都不能在此阶段执行,因为这时通常处在资源限制的状况下。

    网页被浏览器自动 Discarded 以后,它的 Tab 窗口还是在的。如果用户重新访问这个 Tab 页,浏览器将会重新向服务器发出请求,再一次重新加载网页,回到 Active 阶段。

详细可以看这张流程图

page lifecycle

介绍完了网页的各个阶段,现在来介绍一下对应的生命周期有哪些事件。

  • focus和blur(聚焦和失焦)

    这里指网页获取焦点和是去焦点,对应的网页周期则是Passive阶段变为Active阶段和Active阶段变为Passive阶段。

  • visibilitychange

    visibilitychange事件在网页可见状态发生变化时触发,一般发生在以下几种场景。

    • 用户隐藏页面(切换 Tab、最小化浏览器),页面由 Active 阶段变成 Hidden 阶段。
    • 用户重新访问隐藏的页面,页面由 Hidden 阶段变成 Active 阶段。
    • 用户关闭页面,页面会先进入 Hidden 阶段,然后进入 Terminated 阶段。
      1
      document.onvisibilitychange=fn
  • freeze

    freeze事件在网页进入 Frozen 阶段时触发。有个注意点就是从Frozen阶段进入Discarded阶段,不会触发任何事件,无法指定回调函数,只能在进入 Frozen阶段时指定回调函数。关于是否进入Discarded阶段我们可以通过document.wasDiscarded方法来判断,同时,window对象上会新增window.clientId和window.discardedClientId两个属性,用来恢复丢弃前的状态。

    1
    document.onfreeze = fn
  • resume

    resume事件在网页离开 Frozen 阶段,变为 Active / Passive / Hidden 阶段时触发。

    1
    document.resume = fn
  • pageshow和pagehide

    pageshow事件在用户加载网页时触发,有可能是全新的页面加载,也可能是从缓存中获取的页面。如果是从缓存中获取,则该事件对象的event.persisted属性为true,否则为false。
    pagehide事件在用户离开当前网页、进入另一个网页时触发。它的前提是浏览器的 History 记录必须发生变化,跟网页是否可见无关。
    虽然这两个事件的目标是document,但必须将其事件处理程序添加到window。

    1
    2
    3
    4
    5
    6
    7
    8
    9
    10
    11
    12
    13
    14
    15
    16
    17
    var addHandler = function (element, type, handler) {
    if (element.addEventListener) {
    element.addEventListener(type, handler, false);
    } else if (element.attachEvent) {
    element.attachEvent("on" + type, handler);
    } else {
    element["on" + type] = handler;
    }
    }

    addHandler(window, "pageshow", function (event) {
    alert("pageshow");
    })

    addHandler(window, "pagehide", function () {
    alert("pagehide");
    })
  • beforeunload和unload

    beforeunload事件在窗口或文档即将卸载时触发。该事件发生时,文档仍然可见,此时卸载仍可取消。unload事件在页面正在卸载时触发,经过这个事件,网页进入 Terminated 状态。

online state(网络状态)

获取当前的网络状态,同时也有对应的事件去响应网络状态的变化。

1
2
window.addEventListener('online',onlineHandler)
window.addEventListener('offline',offlineHandler)

Vibration(震动)

1
2
3
4
5
6
// 可以传入一个大于0的数字,表示让手机震动相应的时间长度,单位为ms
navigator.vibrate(100)
// 也可以传入一个包含数字的数组,比如下面这样就是代表震动300ms,暂停200ms,震动100ms,暂停400ms,震动100ms
navigator.vibrate([300,200,100,400,100])
// 也可以传入0或者一个全是0的数组,表示暂停震动
navigator.vibrate(0)

execCommand 执行命令

xeccommand 方法让我们可以通过使用它来执行一些命令,比如复制,剪切,打印,修改选中文字粗体、斜体、背景色、颜色,缩进,插入图片等等等等。

1
2
3
4
5
6
7
8
9
10
11
12
// 执行打印命令
doc.execCommand('print')
// 执行复制命令,复制选中区域
doc.execCommand('copy')
// 剪切选中区域
doc.execCommand('cut')
// 全选
doc.execCommand('selectAll')
// 将选中文字变成粗体,同时接下来输入的文字也会成为粗体,
doc.execCommand('bold')
// 将选中文字变成斜体,同时接下来输入的文字也会成为斜体,
doc.execCommand('italic')

React源码解读(三) —— ReactDOM Api

发表于 2019-07-10

今天来讲一下ReactDOM的几个Api

  • findDOMNode
  • unstable_renderSubtreeIntoContainer
  • unmountComponentAtNode

findDOMNode如下:

1
2
3
4
5
6
7
8
9
10
11
12
13
14
15
16
17
18
19
20
21
22
23
24
25
26
27
28
29
30
31
findDOMNode(
componentOrElement: Element | ?React$Component<any, any>,
): null | Element | Text {
if (__DEV__) {
let owner = (ReactCurrentOwner.current: any);
if (owner !== null && owner.stateNode !== null) {
const warnedAboutRefsInRender =
owner.stateNode._warnedAboutRefsInRender;
warningWithoutStack(
warnedAboutRefsInRender,
'%s is accessing findDOMNode inside its render(). ' +
'render() should be a pure function of props and state. It should ' +
'never access something that requires stale data from the previous ' +
'render, such as refs. Move this logic to componentDidMount and ' +
'componentDidUpdate instead.',
getComponentName(owner.type) || 'A component',
);
owner.stateNode._warnedAboutRefsInRender = true;
}
}
if (componentOrElement == null) {
return null;
}
if ((componentOrElement: any).nodeType === ELEMENT_NODE) {
return (componentOrElement: any);
}
if (__DEV__) {
return findHostInstanceWithWarning(componentOrElement, 'findDOMNode');
}
return findHostInstance(componentOrElement);
}

unmountComponentAtNode和unstable_renderSubtreeIntoContainer如下:

1
2
3
4
5
6
7
8
9
10
11
12
13
14
15
16
17
18
19
20
21
22
23
24
25
26
27
28
29
30
31
32
33
34
35
36
37
38
39
40
41
42
43
44
45
46
47
48
49
50
51
52
53
54
55
56
57
58
59
60
61
62
63
64
65
66
67
68
69
70
71
72
73
74
75
76
77
78
79
80
81
82
83
84
85
86
87
88
89
90
91
92
93
94
unstable_renderSubtreeIntoContainer(
parentComponent: React$Component<any, any>,
element: React$Element<any>,
containerNode: DOMContainer,
callback: ?Function,
) {
invariant(
isValidContainer(containerNode),
'Target container is not a DOM element.',
);
invariant(
parentComponent != null && hasInstance(parentComponent),
'parentComponent must be a valid React Component',
);
return legacyRenderSubtreeIntoContainer(
parentComponent,
element,
containerNode,
false,
callback,
);
},

unmountComponentAtNode(container: DOMContainer) {
invariant(
isValidContainer(container),
'unmountComponentAtNode(...): Target container is not a DOM element.',
);

if (__DEV__) {
warningWithoutStack(
!container._reactHasBeenPassedToCreateRootDEV,
'You are calling ReactDOM.unmountComponentAtNode() on a container that was previously ' +
'passed to ReactDOM.%s(). This is not supported. Did you mean to call root.unmount()?',
enableStableConcurrentModeAPIs ? 'createRoot' : 'unstable_createRoot',
);
}

if (container._reactRootContainer) {
if (__DEV__) {
const rootEl = getReactRootElementInContainer(container);
const renderedByDifferentReact = rootEl && !getInstanceFromNode(rootEl);
warningWithoutStack(
!renderedByDifferentReact,
"unmountComponentAtNode(): The node you're attempting to unmount " +
'was rendered by another copy of React.',
);
}

// Unmount should not be batched.
unbatchedUpdates(() => {
legacyRenderSubtreeIntoContainer(null, null, container, false, () => {
container._reactRootContainer = null;
});
});
// If you call unmountComponentAtNode twice in quick succession, you'll
// get `true` twice. That's probably fine?
return true;
} else {
if (__DEV__) {
const rootEl = getReactRootElementInContainer(container);
const hasNonRootReactChild = !!(rootEl && getInstanceFromNode(rootEl));

// Check if the container itself is a React root node.
const isContainerReactRoot =
container.nodeType === ELEMENT_NODE &&
isValidContainer(container.parentNode) &&
!!container.parentNode._reactRootContainer;

warningWithoutStack(
!hasNonRootReactChild,
"unmountComponentAtNode(): The node you're attempting to unmount " +
'was rendered by React and is not a top-level container. %s',
isContainerReactRoot
? 'You may have accidentally passed in a React root node instead ' +
'of its container.'
: 'Instead, have the parent component update its state and ' +
'rerender in order to remove this component.',
);
}

return false;
}
}

export type DOMContainer =
| (Element & {
_reactRootContainer: ?(_ReactRoot | _ReactSyncRoot),
_reactHasBeenPassedToCreateRootDEV: ?boolean,
})
| (Document & {
_reactRootContainer: ?(_ReactRoot | _ReactSyncRoot),
_reactHasBeenPassedToCreateRootDEV: ?boolean,
});

React源码解读(二) —— React.createElement

发表于 2019-04-25

在说createElement之前,首先来比较下下面两种写法。

1
2
3
4
5
6
7
8
9
10
11

//写法一
let pDom=document.createElement("p");
let textNode=document.createTextNode("text");
pDom.appendChild(textNode);
let rootElement=document.getElementById("root");
rootElement.appendChild(pDom);

//写法二
let pDom = <p>text</p>
return <div id='root'>{pDom}</div>

以上两种写法分别是js写法和react写法,很显然,相较于写法一,写法二更符合我们书写html的习惯而且代码也更容易阅读。
那么为什么能用写法二来写呢,我们把代码放进babel里面看一下。

1
2
3
4
5

var pDom = React.createElement("p", null, "text");
return React.createElement("div", {
id: "root"
}, pDom);

可以看到写法二的代码被转成了上述的样子,即,用React.createElement创建了dom节点(虚拟)。我们可以打印看下这个pDom是个什么东西。

pDom

从中可以看出pDom实际上就是一个js对象,有如下属性。

  • $$typeof 唯一标志,它是一个Symbol对象,具有唯一性,在redux中给actions命名的时候用起来很爽。
  • key DOM结构标识,提升diff算法性能。
  • props 标签属性。
  • ref 标志真实Dom引用。
  • type 该虚拟dom的标签类型。
  • _owner 16版本新加的东西,是个FiberNode对象,直译就是纤维节点,可以理解成片段节点。
  • _store 暂时不清楚(源码里也没看懂用来干嘛的)
    所以可以这样理解,虚拟节点就是react对dom的一个解析并将其用js对象表示出来。

现在来看下createElement的源码。

首先来看下入参。

1
2
3
4
5
6
7
8
9
const RESERVED_PROPS = {    //需要过滤的propNames
key: true,
ref: true,
__self: true,
__source: true,
};
export function createElement(type, config, children) {
...
}

结合之前看的babel编译后的代码我们可以看出来type,config,children代表什么,type是指节点,config是指传给该标签的属性,children是子节点。
接下来看内部代码。

1
2
3
4
5
6
7
8
9
10
11
12
13
14
15
16
17
18
19
20
21
22
23
24
25
26
27
28
29
30
31
let propName;

// Reserved names are extracted
const props = {};

let key = null;
let ref = null;
let self = null;
let source = null;

if (config != null) {
if (hasValidRef(config)) { //判断config中是否存在ref
ref = config.ref;
}
if (hasValidKey(config)) { //判断config中是否存在key
key = '' + config.key;
}

self = config.__self === undefined ? null : config.__self;
source = config.__source === undefined ? null : config.__source;

// Remaining properties are added to a new props object
for (propName in config) { //遍历属性并将其添加到props里面
if (
hasOwnProperty.call(config, propName) &&
!RESERVED_PROPS.hasOwnProperty(propName) //这里是过滤不需要绑定的propNames
) {
props[propName] = config[propName];
}
}
}

再接下来就是children的处理。

1
2
3
4
5
6
7
8
9
10
11
12
13
14
15
16
17
18

// Children can be more than one argument, and those are transferred onto
// the newly allocated props object.
const childrenLength = arguments.length - 2;
if (childrenLength === 1) { //这里就解释了为什么当你标签下只有一个子标签的时候你用数组方式无法取到
props.children = children;
} else if (childrenLength > 1) {
const childArray = Array(childrenLength);
for (let i = 0; i < childrenLength; i++) {
childArray[i] = arguments[i + 2];
}
if (__DEV__) { //开发环境下的特殊操作
if (Object.freeze) {
Object.freeze(childArray); //es6语法,freeze方法可以冻结一个对象使其无法被操作
}
}
props.children = childArray;
}

在接下来

1
2
3
4
5
6
7
8
9
10
11
12
13
14
15
16
17
18
19
20
21
22
23
// Resolve default props
if (type && type.defaultProps) {
const defaultProps = type.defaultProps;
for (propName in defaultProps) { //将defaultProps添加到props里面
if (props[propName] === undefined) {
props[propName] = defaultProps[propName];
}
}
}
if (__DEV__) {
if (key || ref) {
const displayName =
typeof type === 'function'
? type.displayName || type.name || 'Unknown' //标签名的获取
: type;
if (key) {
defineKeyPropWarningGetter(props, displayName); //用来把key添加中props中。
}
if (ref) {
defineRefPropWarningGetter(props, displayName); //用来把ref添加中props中。
}
}
}
1
2
3
4
5
6
7
8
9
10
11
12
13
14
15
16
17
18
19
20
21
22
23
24
25
26
27
28
29
30
31
32
33
34
35
36
37
38
39
40
41
function defineKeyPropWarningGetter(props, displayName) {
const warnAboutAccessingKey = function() {
if (!specialPropKeyWarningShown) {
specialPropKeyWarningShown = true;
warningWithoutStack(
false,
'%s: `key` is not a prop. Trying to access it will result ' +
'in `undefined` being returned. If you need to access the same ' +
'value within the child component, you should pass it as a different ' +
'prop. (https://fb.me/react-special-props)',
displayName,
);
}
};
warnAboutAccessingKey.isReactWarning = true;
Object.defineProperty(props, 'key', { //在props中添加一个key属性,并将get和configurable赋给key
get: warnAboutAccessingKey,
configurable: true,
});
}

function defineRefPropWarningGetter(props, displayName) {
const warnAboutAccessingRef = function() {
if (!specialPropRefWarningShown) {
specialPropRefWarningShown = true;
warningWithoutStack(
false,
'%s: `ref` is not a prop. Trying to access it will result ' +
'in `undefined` being returned. If you need to access the same ' +
'value within the child component, you should pass it as a different ' +
'prop. (https://fb.me/react-special-props)',
displayName,
);
}
};
warnAboutAccessingRef.isReactWarning = true;
Object.defineProperty(props, 'ref', { //在props中添加一个ref属性,并将get和configurable赋给ref
get: warnAboutAccessingRef,
configurable: true,
});
}

最后就是返回一个ReactElement对象

1
2
3
4
5
6
7
8
9
10
11
12
13
14
15
16
17
18
19
20
21
22
23
24
25
26
27
28
29
30
31
32
33
34
35
36
37
38
39
40
41
42
43
44
45
46
47
48
49
50
51
52
53
54
55
56
57
58
59
60
61
62
63
64
65
return ReactElement(
type,
key,
ref,
self,
source,
ReactCurrentOwner.current,
props,
);

const ReactElement = function(type, key, ref, self, source, owner, props) {
const element = {
// This tag allows us to uniquely identify this as a React Element
$$typeof: REACT_ELEMENT_TYPE,

// Built-in properties that belong on the element
type: type,
key: key,
ref: ref,
props: props,

// Record the component responsible for creating this element.
_owner: owner,
};

if (__DEV__) {
// The validation flag is currently mutative. We put it on
// an external backing store so that we can freeze the whole object.
// This can be replaced with a WeakMap once they are implemented in
// commonly used development environments.
element._store = {};

// To make comparing ReactElements easier for testing purposes, we make
// the validation flag non-enumerable (where possible, which should
// include every environment we run tests in), so the test framework
// ignores it.
Object.defineProperty(element._store, 'validated', {
configurable: false,
enumerable: false,
writable: true,
value: false,
});
// self and source are DEV only properties.
Object.defineProperty(element, '_self', {
configurable: false,
enumerable: false,
writable: false,
value: self,
});
// Two elements created in two different places should be considered
// equal for testing purposes and therefore we hide it from enumeration.
Object.defineProperty(element, '_source', {
configurable: false,
enumerable: false,
writable: false,
value: source,
});
if (Object.freeze) {
Object.freeze(element.props);
Object.freeze(element);
}
}

return element;
};

以上

React源码解读(一) ——— ReactDom.render()

发表于 2019-04-24

React源码解读(一)

前言

这两周面试了几个人,虽然是一面,问的不深,但是给我的感觉都是对React了解的比较浅,稍微往深一点问基本都是回答得很宽泛,答不到点子上,虽然有引导他们去思考但是由于react的理解很片面所以基本也答不出来,因此就来写个我对于react的源码的解读,我将从项目结构入手分析React源码。

ReactDOM.render() (github上ReactDOM.js 672行)

一个React项目的最外层就是一个指定的DOM节点,通过render函数将我们需要渲染的组件插入到指定DOM节点中来实现视图,来看看render到底做了什么。
源码如下:

1
2
3
4
5
6
7
8
9
10
11
12
13
14
15
16
17
18
19
20
21
22
23
24
25
26
27
28
29
30
31
32
33
34
35
36
37
38
39
40
41
42
43
44
45
46
47
48
49
50
51
52
53
54
55
56
57
58
59
60
61
62
63
64
65
66
67
68
69
70
render(
element: React$Element<any>,
container: DOMContainer,
callback: ?Function,
) {
return legacyRenderSubtreeIntoContainer( //legacyRenderSubtreeIntoContainer 遗留渲染子树到容器(这名字我只能这么白话翻译了,读不懂)
null,
element,
container,
false,
callback,
);
},

function legacyRenderSubtreeIntoContainer(
parentComponent: ?React$Component<any, any>, //父组件
children: ReactNodeList, //子组件,ReactElement
container: DOMContainer, //DOM容器
forceHydrate: boolean, //强制注水(用于ssr,寓意使干巴巴的数据变成水灵灵的HTML)
callback: ?Function, //回调
) {
// TODO: Without `any` type, Flow says "Property cannot be accessed on any
// member of intersection type." Whyyyyyy.
let root: Root = (container._reactRootContainer: any);
if (!root) { //不存在container._reactRootContainer时,及第一次渲染
// Initial mount //初始化React根节点(虚拟DOM)
root = container._reactRootContainer = legacyCreateRootFromDOMContainer( //其实是个ReactRoot对象
container,
forceHydrate,
);
if (typeof callback === 'function') {
const originalCallback = callback;
callback = function() {
const instance = getPublicRootInstance(root._internalRoot);
originalCallback.call(instance);
};
}
// Initial mount should not be batched.
unbatchedUpdates(() => {
if (parentComponent != null) {
root.legacy_renderSubtreeIntoContainer(
parentComponent,
children,
callback,
);
} else {
root.render(children, callback); //root对象会去走这个render方法
}
});
} else {
if (typeof callback === 'function') {
const originalCallback = callback;
callback = function() {
const instance = getPublicRootInstance(root._internalRoot);
originalCallback.call(instance);
};
}
// Update
if (parentComponent != null) {
root.legacy_renderSubtreeIntoContainer(
parentComponent,
children,
callback,
);
} else {
root.render(children, callback);
}
}
return getPublicRootInstance(root._internalRoot);
}

由于render方法在React生命周期各个时期中有着不同的作用,因此render中分了首次挂载和更新两种情况。

首次挂载时,通过legacyCreateRootFromDOMContainer生成了一个root对象,并将这个root对象赋给了DOM容器,下面来看看legacyCreateRootFromDOMContainer。

1
2
3
4
5
6
7
8
9
10
11
12
13
14
15
16
17
18
function legacyCreateRootFromDOMContainer(
container: DOMContainer,
forceHydrate: boolean,
): Root {
const shouldHydrate =
forceHydrate || shouldHydrateDueToLegacyHeuristic(container);
// First clear any existing content.
if (!shouldHydrate) {
let warned = false;
let rootSibling;
while ((rootSibling = container.lastChild)) {
container.removeChild(rootSibling);
}
}
// Legacy roots are not async by default.
const isConcurrent = false;
return new ReactRoot(container, isConcurrent, shouldHydrate);
}

可以看出来它干了两件事情,一个是当不应该注水的时候清空了container的子节点(应该就是非ssr的情况下),还有一件事情就是返回了一个新的ReactRoot对象。问题又来了这个ReactRoot又是个什么东西。

1
2
3
4
5
6
7
8
9
10
11
12
13
14
15
16
17
18
19
20
21
22
23
24
25
26
27
28
29
30
31
32
33
34
35
36
37
38
39
function ReactRoot(
container: DOMContainer,
isConcurrent: boolean,
hydrate: boolean,
) {
const root = createContainer(container, isConcurrent, hydrate);
this._internalRoot = root;
}

ReactRoot.prototype.render = function( //渲染
children: ReactNodeList,
callback: ?() => mixed,
): Work {
const root = this._internalRoot;
const work = new ReactWork();
callback = callback === undefined ? null : callback;
if (callback !== null) {
work.then(callback);
}
updateContainer(children, root, null, work._onCommit); //最终会执行updateContainer方法并返回一个ReactWork对象
return work;
};

ReactRoot.prototype.legacy_renderSubtreeIntoContainer = function(
parentComponent: ?React$Component<any, any>,
children: ReactNodeList,
callback: ?() => mixed,
): Work {
const root = this._internalRoot;
const work = new ReactWork();
callback = callback === undefined ? null : callback;
if (callback !== null) {
work.then(callback);
}
updateContainer(children, root, parentComponent, work._onCommit);
return work;
};

...

从上面可以看出来这个ReactRoot是个构造函数,它有render等方法,上述的root则会去执行render方法并返回一个ReactWork对象,那接下来就是这个updateContainer到底干了些什么了。通过上面的层层扒皮,无论怎样判断,最终都会到render方法和legacy_renderSubtreeIntoContainer方法中,而这两个方法的核心就是updateContainer,无非就是传不传父组件而已。

1
2
3
4
5
6
7
8
9
10
11
12
13
14
15
16
17
18
19
20
21
22
23
24
25
26
27
28
29
30
31
32
33
34
35
36
37
38
39
40
41
42
43
44
45
46
47
48
49
50
51
52
53
54
55
56
57
58
59
60
export function updateContainer(
element: ReactNodeList,
container: OpaqueRoot,
parentComponent: ?React$Component<any, any>,
callback: ?Function,
): ExpirationTime {
const current = container.current;
const currentTime = requestCurrentTime();
const expirationTime = computeExpirationForFiber(currentTime, current);
return updateContainerAtExpirationTime(
element,
container,
parentComponent,
expirationTime,
callback,
);
}
export function updateContainerAtExpirationTime(
element: ReactNodeList,
container: OpaqueRoot,
parentComponent: ?React$Component<any, any>,
expirationTime: ExpirationTime,
callback: ?Function,
) {
// TODO: If this is a nested container, this won't be the root.
const current = container.current;

const context = getContextForSubtree(parentComponent);
if (container.context === null) {
container.context = context;
} else {
container.pendingContext = context;
}

return scheduleRootUpdate(current, element, expirationTime, callback); //根更新计划表
}

function scheduleRootUpdate(
current: Fiber,
element: ReactNodeList,
expirationTime: ExpirationTime,
callback: ?Function,
) {

const update = createUpdate(expirationTime);
// Caution: React DevTools currently depends on this property
// being called "element".
update.payload = {element};

callback = callback === undefined ? null : callback;
if (callback !== null) {
update.callback = callback;
}

flushPassiveEffects();
enqueueUpdate(current, update);
scheduleWork(current, expirationTime);

return expirationTime;
}

updateContainer传入的参数有虚拟dom对象树、之前造出来的root中和fiber相关的_internalRoot、父组件、回调函数。

React Hooks看法

发表于 2019-02-28

继上次分享了React新特性,当然参考了论坛中一些人的看法,在社区中,大部分布道者都提到了诸如“过于冗繁的组件嵌套”、“与内部原理的更亲密接触”、“比原先更细粒度的逻辑组织与复用”等优势,这次来谈下对于新特性中的hooks的看法。

React新特性中的hooks强调了用函数式组件的思想来代替类组件,然而这个也颠覆了react中原本函数式组件的写法。

1
2
3
function TextComponent(text){
return <p>{text}</p>
}

上例代码是一个非常简单的函数组件,只依赖入参。

1
2
3
4
function TextComponent(){
let [text,changeText] = useState('hello');
return <p>{text}</p>
}

上例代码是用了hooks的一个函数组件。
虽然在功能上两种写法是一致,但是可以看出hooks的组件并不是纯粹的输入到输出,而是变成了changeText方法控制的输出,text是依赖changeText方法的。也就是说对于函数组件来说更多地去依赖了changeText方法这一逻辑控制。

在这里我们可以先讨论下关于类组件和函数组件。

某些情况下函数组件可以直接代替类组件,但函数组件和类组件之间最大的区别就是一个有状态机制,一个没有状态机制。函数组价没有内部状态变化机制,只能从外部进行状态的驱动。

1
2
3
function Hello(props, context) {
return <span>Hello {props.name}</span>
}
1
2
3
4
5
6
7
8
9
10
11
12
13
14
class Hello extends Component {
state = {
name: 'haha'
};

handleClick=()=>{
this.setState({
name: 'hehe'
});
}
render() {
return <span onClick={this.handleClick}>Hello {this.state.name}</span>
}
}

状态机制的存在使得函数组件无法取代类组件,因此我们写代码的时候更多的都是去写类组件。
但类组件也有很多不足之处。

  • 标签嵌套地狱

    1
    2
    3
    4
    5
    6
    7
    8
    9
    10
    11
    12
    13
    14
    15
    16
    17
    render() {
    return (
    <FooContext.Provider value={this.state.foo}>
    <BarContext.Provider value={this.state.bar}>
    <BarContext.Consumer>
    {bar => (
    <FooContext.Consumer>
    {foo => (
    console.log(bar, foo)
    )}
    </FooContext.Consumer>
    )}
    </BarContext.Consumer>
    </BarContext.Provider>
    </FooContext.Provider>
    )
    }
  • 一些有状态的逻辑比较难重用,需要大量借助Context

其实这个也是react的不足之处,因此React团队基于函数组件提出hooks的概念。

以上的例子可以综合成下面这个hook例子

1
2
3
4
5
6
7
8
9
10
11
12
13
14
15
16
17
18
19
20
21
22
23
24
25
26
27
28
29
import { useState, useContext, useEffect, createContext } from 'react';
const FooContext = createContext('foo');
const BarContext = createContext('bar');

function Hello(props, context) {
const [name, setName] = useState('haha');

const foo = useContext(FooContext);
const bar = useContext(BarContext);

const handleClick = () => setName('hehe');

useEffect(() => {
return () => {
}
}, [name]);

return (
<>
<span onClick={handleClick}>Hello {name}</span>

<FooContext.Provider>
<BarContext.Provider>
{foo}, {bar}
</BarContext.Provider>
</FooContext.Provider>
</>
)
}

从上面其实可以看出一些react团队的编码思想。

  • let [text,changeText] = useState('hello')这种写法可以让状态和逻辑两两配对,并且因为使用者可以用useState自定义各种hooks,所以可以让开发者更好地处理代码结构;
  • 状态的颗粒度可以很小,由于配对的原因可控范围也很小,对于整体的影响范围不大,单个组件中能用多个hook来进行状态修改,甚至可以拆分成多个组件或状态;
    1
    2
    3
    4
    5
    6
    7
    8
    9
    10
    11
    12
    13
    14
    15
    16
    17
    18
    19
    20
    21
    22
    let { useState, useEffect } = require('react');

    function useIsHear() {
    let [isHear, setIsHear] = useState(false);

    function isHearChange() {
    setIsHear(true);
    }

    useEffect(() => {
    isHearChange()
    return () => {
    };
    }, [isHear]);

    return isHear;
    }

    function Answer() {
    let isHear = useIsHear();
    return {isHear ? <span>answer</span>:<span>leave</span>}
    }

通过hooks可以方便的把状态进行分离,每一个状态分离后可复用,通过组合的方式提供一种有状态逻辑的复用。

  • 通过hooks更容易实现逻辑与展示的分离,函数组件依然会是一个实现渲染逻辑的纯组件,对状态的管理已经被hooks内部所实现,即有状态无渲染和有渲染无状态;
    1
    2
    3
    4
    5
    6
    7
    8
    function Hello(props){
    return <p>Hello {props.name}</p>
    }

    function useHello(){
    let [hello,setHello] = useState('hello');
    return [hello,setHello];
    }
12
AmamiRyoin

AmamiRyoin

20 日志
14 标签
RSS
GitHub Twitter
© 2022 AmamiRyoin
由 Hexo 强力驱动
|
主题 — NexT.Gemini v5.1.4